Showing posts with label how to update. Show all posts

Friday, May 10, 2013

0 How To Update Nexus S To Android 4.1 Via OTA

Google recently released an Jelly Bean update a week ago or usually called Android 4.1 for Nexus S smartphone via OTA update. Of course, as an android and Nexus S  users can not wait to taste the joy of Jelly Bean. Various interesting features added in the latest update of the Android OS, the most significant is that the UI is responsive and smooth, thanks to Project Butte. The Displacement or the application feels more smooth transition thanks to the significant improvement in UI rendering engine. To know more about the new features read on List new features on android 4.1. Android is good

Sometimes many nexus s user have question why the update notification didn't appear on system update. So today we will give some tips to handle those problem.
Some of users in United Kingdom it have been 2 weeks after the Jelly Bean update via OTA update released on its own Nexus S smartphone. But there are some users are not getting anything, checked into the System Update but there are not appear the update information. If you are familiar with flashing rom does not matter, just download the zip and flash via recovery updates, however, for ordinary users who are unfamiliar with the root, flashing rom etc, can only hope the OTA update appeared on the device itself.

Well here I am trying to share a little trick to provoke OTA update for nexus s, so the update notofocation will appear on the System Update. 

Update Nexus S To Jelly Bean via OTA

  1. Go to Settings -> Apps
  2. Select the All tab, if it is not appear, slide the tab to the left.
  3. From the list of applications, select Google Services Framework
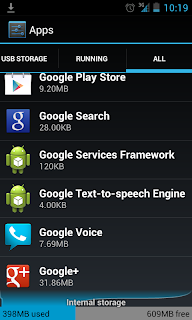
    update nexus s to jelly bean
  4. Click the Clear Data and then Force Stop button
    update nexus s to android 41 via ota
  5. Go to Settings -> About -> System Update
    android 41 update for nexus s via ota
  6. If successful, OTA updates have bobbed.
  7. Good luck you hace successfully update to jelly bean via ota


Important


  • If the OTA still does not appear, repeat STEP 2 above until the OTA update appear. Sometimes it takes more than one attempt to be sticking out OTA updates.
  • If you still don't get the update notification on your nexus s, try the manual update via recovery .
  • This trick also applies to the Galaxy Nexus OTA update.

Saturday, February 23, 2013

0 Tutorial Restore Eee Pad Transformer TF101 To Original Firmware

Today comes the long awaited update to Android 4.0 ICS for the excellent Asus tablet the Eee Pad Transformer TF101. To complete the upgrade to Android Ice Cream sandwich or also known as ICS, please note that you will need the original firmware version installed on your asus tablet and not a custom rom / custom firmware because otherwise it will be impossible to update to the latest Android release, issued by the Asus company. So to update to android ics you first must flash orirginal stock rom if you have installed custom rom before.Look great android

restore eee pad transformer tf 101 to original rom

Now below i will show you in a few simple steps to restore to original rom factory default rom for Eee Pad Transformer TF101:

Requirements


  • Download the official update from Asus site
  • Have at least 1 Gb MicroSD
  • The tablet can have any ROMs.
  • please note when you do this it will also delete your phone memory so you must backup all your phone data
  • Do nandroid Backup just in case if anything goes wrong you can change back to your latest state.


Restore Eee Pad Transformer TF101 To Factory Default ROM 

  1. Once you have downloaded the firmware, unpack it and you will have a new folder called ASUS.
  2. Copy this folder in MicroSD.
  3. Reboot into Recovery.
  4. Made various wipe partition, wipe cache, and dalvik
  5. Install the previously copied to the SD file, which is located in ASUS.
  6. Reboot and you will have the initial installation as if it had been switched on for the first time.

Once you have done all these steps above, then finally you'll be able to update Transformer TF101 to Ice Cream Sandwich.

0 Install Cm 7 With Jelly Bean Style For LG Optimus GT540

Find easy step to install jelly bean theme with cm 7 custom rom for lg optimus GT 540. After seeing updates for Samsung and HTC device which have already got jelly bean custom rom now could not miss targeted attention to the LG and its unparalleled designs. So here's a guide, cyanogenmod 7 stable with jelly bean theme update only for all users who have an LG Optimus GT540. Follow this procedure and finally you will have the latest Android update available, that you've been anxiously awaiting. Here it is the guideLook great android

Requirements To install Cyanogenmod 7


  • LG Optimus GT540 with ClockworkMod Recovery.
  • Cyanogenmod 7 for LG Optimus GT 540 ROM, download cm 7 .
  • Backup all your data in order to avoid unpleasant loss.
  • your lg phone Battery state at least at 80%.

below is the screenshot from the cm7 preview after installed
cm7 with jelly bean for lg optimus gt 540

Install Cm 7 With Jelly Bean Tutorial


  1. Copy the downloaded package, moving it in the SD Card of your device and switch it off.
  2. Start ClockworkMod Recovery mode by pressing and holding down the Home and power button together. Starts the mode.
  3. Create a nandroid Backup your current ROM so you can restore it in case there was any error in the fne( read what is nandroid backup ). To do this choose the Backup and Restore and Backup.
  4. Now select Wipe data/Factory Reset and confirm.
  5. Now select Install ZIP from SD Card and still Choose ZIP from SD Card and look for the ROM file previously copied to the SD Card.
  6. Wait until the installation has completed and repeat the previous step for the Google Apps package.
  7. Select then Go Back and finally Reboot System Now.

We would like to say that if your LG smartphone has this wonderful update is only our merits, but in reality, this material used in this guide is the result of hard work of XDA Developers, Android programmers which have been do work hard to create this rom cm 7 for lg optimus gt 540, the same that are used now, and that you will find in other guides in this section. All free and updated. All for you so stay follow us tutorial upgrade android

Friday, February 22, 2013

0 How to Update Manually Nexus 10 To android 4.2.2

After much rumor of android 4.2.2 leak on the internet, finally the new android 4.2.2 with JDQ39 version has made an appearance on the official Android device ( at this time we discuss about nexus 10), at this moment this latest android version still only available for nexus 10, 4, 7, and Galaxy nexus. The release was very fast for all nexus devices and the update release was less than 48 hours, The update came via OTA. new perform more fast
android 422 update for nexus 10

Well, then all you have to do to update via OTA is go to menu settings-> about phone/tablet-> system updates. If your device does not detect any update, you can force it to receive the OTA by following this simple guide. how to force ota update for nexus device

That is why we want to give interesting guides on this blog that will allow you to update your Nexus 10 to android 4.2.2 manually without waiting OTA update come to your country. You can just install the update directly from manual recovery.

We are confident that the update will not delay to much to arrive in our country for the entire range of Nexus, but if you do not want to wait and very curious about the Android 4.2.2 performance you can follow the guide below

Tutorial manually update Nexus 10 to android 4.2.2 JDQ39

With this guide you can manually install the new update to Android 4.2.2 Jelly Bean.
Download android 4.2.2 firmware : paste this address to your browser http://adf.ly/JUFaE

android 4.2.2 Update guide With The Original Recovery

  1. Download the firmware package
  2. Put it in the folder where you have installed the adb
  3. Turn off your Tablet
  4. Connect it via USB to your computer
  5. Turn on with Power + Vol. Down
  6. Click twice the vol. down and enter in recovery mode (press Power + Volume down on to the display  entries)
  7. Select update from adb
  8. Open the terminal by dragging the folder with adb and type :
    adb Sideloading eaef14432ff5.signed-mantaray-JDQ39-from-JOP40D.eaef1443.zip
  9. After the process complete, restart your Tablet
read also : how to root nexus 10

Update guide With Custom Recovery

  1. Download the firmware package
  2. Put it in the memory of your nexus 10. then rename it to update.zip
  3. Turn off your Tablet
  4. Turn on with Power + Vol. Down
  5. Click twice the vol. down and enter in recovery mode (press Power + Vol down to display the entries)
  6. Select update form sdcard
  7. Install it and restart your Tablet
Finish. I hope this tutorial will be bery usefull for who want to install android 4.2.2 update manually on Nexus 10.

0 How To Flash Official Android 4.2.2 To Galaxy Nexus

If you have a Galaxy Nexus, now you can update your device to the latest version of android 4.2.2 Jelly Bean. To update it you can't do it through OTA update if you don't force it, or you also can do it by flash it manually. If you are still new in android modding or customization don't panic, On this post i will show you how to flash android 4.2.2 To Galaxy Nexus. You just need to read it carefully and prepare all the requirements

Recently Google have been released the latest android version, and at this time is still in jelly bean with 4.2.2 version. After releasing android 4.2.2 updates via OTA for galaxy nexus and nexus 7, Google also releases the Factory Image of this version. The Factory Image are complete images of your system that may be useful to completely restore your Nexus to factory settings, making them return to the stock as Google Inc made them.new perform more fast
flash manual galaxy nexus to android 4.2.2

Read First
This procedure can be very usefull especially when, for example, you customize too much with your device, including root permissions, custom recovery custom rom, etc, and you would need or simply desire return it to stock. Installing the Factory Image, however you will lose all data on your device, so you should make a backup before you perform any necessary work.

How To Flash Official Android 4.2.2 On Galaxy Nexus

Below i have wrote complete instruction how to flash or install Android 4.2.2 JDQ39 with yakju version to your device

IMPORTANT
this guide is also valid for rebrand your galaxy nexus from operator and make it pure from google in all aspect, so you don't need wait the update from operator which is usually need more time than google version


Installation Process

  1. Download the factory image from developers.google
  2. Extract the contents in the same Platform Tools folder of Android SDK (in case you haven't install it, download android sdk)
  3. connect your galaxy nexus to the pc with usb debugging
  4. Open a command prompt and go to the folder where you extracted the files
  5. Type the following:
    adb reboot bootloader
    fastboot flash boot loader [full name of the bootloader file without bracket.img]
    fastboot reboot-bootloader
    fastboot flash radio [full name of the radio file without bracket.img]
    fastboot reboot-bootloader
    fastboot-w update [full name of the image file.zip]
    fastboot reboot-bootloader
    fastboot oem lock


Ok thats it for the guide to install android 4.2.2 with JDQ39 firmware version on Galaxy Nexus. Hope wthis tutorial will help you. See you in another android smartphone guide

0 Tutorial Manual Update Nexus 7 Wifi To Android 4.2.2 JDQ39

Android 4.2.2 finally arrives in England and europe via OTA. So now if you have Nexus 7 Wi-fi read the following tutorial to update Nexus 7 to android 4.2.2. Actually at yesterday there came the notification of the arrival of the new version of android. Throughout the night, so most of the Nexus 7 wifi europe should have received the update to android 4.2.2 jelly bean, maybe this is the last version for jelly bean !new perform more fast
update manually nexus 7 wi-fi to android 422

The update is expected also for Nexus 4 everywhere and, in Italy, for Galaxy Nexus yakju and Nexus 7 with 3 g module. If you are still owners of a Nexus 7 wi-fi version only then go into settings-> information about tablet-system-> updates > check now.

If there is anything you try to follow our Guide how to force OTA update, valid for any Nexus device although in that tutorial speaks exclusively for Galaxy Nexus.

As we have already pointed out, in the official changelog we said only of performance improvements and bug fixes while we managed to find several more concrete changes. here is some of android 4.2.2 changelog :
  • Data protection from theft of the device with USB debugging
  • Download notifications with seconds remaining
  • Quick Settings that support press and hold
  • New sounds for low battery and wireless charging
  • New animations for the Gallery
    • In particular, we noted the lack of blue glow at the end of the .ICS, replaced by an animation that acts on the previews.
To read more detail go to previous post : list of android 4.2.2 feature
But if you still want to flash android 4.2.2 manually on nexus 7 Wi-fi you can read the step below


How To Update Manually Nexus 7 Wi-fi To Android 4.2.2 JDQ39 4.2.2

With this guide you can manually install the new update to Android 4.2.2 Jelly Bean for Nexus 7 Wi-Fi.

Download Android 4.2.2 JDQ39

Guide If you are using the Original Recovery
  • Download the package over
  • Put it in the folder where you have adb
  • Turn off your Tablet
  • Connect it via USB to your computer
  • Turn on with Power + Vol. Down
  • Click twice vol. down and enter in recovery mode (press Power + Vol below. on to display the entries)
  • Select select update from adb
  • Open the terminal by dragging the folder with adb and type
  • adb Sideloading 6ece895ecb23.signed-nakasi-JDQ39-from-JOP40D.6ece895e.zip
  • After Completed, restart your Tablet


Guide If you are using Custom Recovery
  1. Download the package over
  2. Put it in the memory of Tablet renaming it update.zip
  3. Turn off your Tablet
  4. Turn on with Power + Vol. Down
  5. Click twice vol. down and enter in recovery mode (press Power + Vol below. on to display the entries)
  6. Select update form sdcard
  7. Install it and restart your Tablet


Congratulation Now you have successfully flash android 4.2.2 jdq39 into you Nexus 7 Wi-fi. After try this we also accept your comment and opinion about this rom.
 

Android tutorial and review Copyright © 2011 - |- Template created by O Pregador - |- Powered by Blogger Templates