Showing posts with label how to root. Show all posts

Tuesday, August 13, 2013

0 Easy Tutorial Root Samsung Epic 4G SPH D700

To Get full Acces to Your Samsung Epic 4G System File you must have root acces, The advantage if you root your android device you will have full access to the system file, which will allow you to more customize your android device also you will ba able to install many android apps and games that need root acces to install. So today i will share how to root Samsung Epic 4G SPH D700. But Before we start the guide i will give some explanation. Before i start the discussion about complete guide to have root access. have you prepare your Samsung Epic? If so, Now read the following step, but make sure you read all the step that i mentioned below completely.this perfect and more userfriendly


Requirements
  • Samsung Epic 4G SPHD700.
  • Windows PC.
  • USB driver installed on your PC You can use Samsung KIES to obtain them.
  • Enable USB Debugging (Settings> Application> Development> USB Debugging).
  • Disable antivirus, firewalls and the like before you begin the process, to avoid conflict.
  • Backup all your personal data in order to avoid unpleasant losses.
  • Download the rooting package from this url http://adf.ly/G89SR (paste to your browser) .


How To Root Samsung Epic 4G SPH D700

below is the complete explanation of the root tutorial for the samsung epic 4g. The tutorial root below is based with my experience and i didn't find any problem. So i hope you will successfully do the root process

  1. Download the package for rooting on your PC.
  2. Extract the zip file and you will found 3 files on the file that you have xtracted. Put them all in the same, single folder.
  3. On your PC, launch the application by double clicking on odin3 Odin v1.85.exe. This should launch the application on your PC Odin3.
  4. Turn off your Galaxy Epic 4G.
  5. Then Start the download mode. You can do this by press the number 1 on your keypad while the computer is starting up.
  6. With Odin v3 opened, now connect your device to your PC via a USB cable.
  7. Odin3 will display instantly to check the connection with your phone by displaying the warning message "Added." Otherwise, re-install the USB drivers and try again from the beginning.
  8. Now select the box in the user interface of Odin3 PDA. You will be asked to search for a file. Are you looking for the file that you extracted, among those, select the file:
    acs-eb30-clockwork-epic-touch-4g-sep-20-4-00-pm.tar
  9. Make sure that the settings on Odin3 have not been changed accidentally, otherwise this will make the whole process failed and cause damage to your phone.
  10. Then select the Start button in this Odin3 to start rooting your Samsung Epic 4G. It may take a few minutes for the whole process is completed. If the rooting was successful, you should see the message "PASS" tab of Odin3.
  11. Done that, too, end up disconnecting your phone.


Finish. The Explanation is easy enough to do right? This procedure do not require high skill, it is easy to do. So for you that have Samsung Epic 4G SPH D700 by this tutorial you will be able to do the root process so you will have super user access to do many things with your phone.

Sunday, August 11, 2013

0 How To Root Google Asus Nexus 7 With Root Toolkit

One of the best selling tablet with high level hardware is definitely the Google Asus Nexus 7. This tablet is manufactured by ASUS and sold in 16 GB version at just € 249. I want to show you today how to root google asus Nexus 7, which will give super user permission on your system file with quickly and easily method by use root toolkit.

I state that I do not own the google asus Nexus 7 and I could not test the process, but doing some research on the internet seems to be working without any problem.this perfect and more userfriendly

Requirements For Guide to root Google Asus Nexus 7

  • Nexus 7 Toolkit
  • At least 50% battery
  • Drivers installed correctly
  • Download all the neeeded file paste this url to browser

nexus7 root toolkit


Caution: the root procedure will erase all data on your device. we assume some responsibility for any problems arising from this guide. Proceed only at your own risk.

Complete Tutorial Root Google Asus Nexus 7
Below is my exlpanation about root guide for google asus nexus 7. please read all the stap completely for the best result

  1. Download and install the Nexus 7 Toolkit here : paste thr url to browser http://adf.ly/GBMUe
  2. Open the program and enter the number 1 in order to install drivers on your pc
  3. Turn off your Nexus 7
  4. Switch on the device by holding down the buttons Volume + and Volume- to enter fastmode
  5. Connect the Nexus 7 pc fastmode
  6. Now see the Bootloader by pressing 3 "Unlock or lock your bootloader" Nexus 7 program Toolkit
  7. Press 1 "Unlock bootloader" and the tablet will ask you to proceed, press YES
  8. First step completed, we have unlocked the bootloader! Now we can proceed to the ROOT. Return to the main menu of the suite and again in Fastboot mode press the 4 entry "Root your Tablet"
  9. At the request of the suite just answer YES again
  10. Expect Nexus 7 restart and follow the initial configuration
  11. On tablet go to "settings-> developer Options" options enabled and select "USB Debugging"
  12. Wait until the end of the procedure.

how to root nexus 7


Congrats, now your tablet has the unlocked bootloader and comes with ROOT privileges. Now you can do whatever you want with your tablet, including installing a recovery to Flash custom ROMs.

Before I conclude, I want to highlight the possibility to backup of your tablet, always through the Nexus 7 Toolkit. When you open the application, pressing 2 you can open the backup menu of the app and data, with the possibility that you see in the image below:


tutorial root nexus 7

So my advice is to make a backup before proceeding to unlock bootloader and root rights assignment.

Read my another tutorial for nexus device
one click root for nexus 4. nexus 7, and nexus 10
Galaxy Nexus To android 4.1

Thats for tutorial for android today. I hope this tutorial about root google asus nexus 7 can help you.

Thursday, July 18, 2013

0 Easy Tutorial Root For Nexus 4 Nexus 7 And Nexus10 With One Click Root

Nexus user maybe still confuse how to root nexus 4, nexus 7, and nexus 10 with easy step and easy to understand. Now you can get root acces on your nexus tablet with easy step and complete tutorial. Because i will show you with rot toolkit or also known as one click root for nexus tablet.Android is good

one click root for nexus7 nexus 4 nexus10

One Click Root For Nexus Device

Back to my previous post on last mont, which i have discussed about Google announced nexus 4, nexus 7, and nexus 10 release. the release of 3 New Nexus Google has completed the offer available for its flagship smartphone, The tablet is suitable for travelers and the Tablet 10 suitable for the most lengthy and laborious trip.

With the introduction of the Nexus 4 , the Smartphone world has a new benchmark with a powerful and Hardware Design enviable, the Nexus 7 looks like the Tablet with 7 inch which portable, powerful and affordable to many, completes the The Nexus 10 with the tablet with 10 inch which issuitable for a more intense with excellent vision movies and editing any documents.

Today we look at tutorial root Nexus 4, Nexus 7 only Wi-fi, even on the Nexus 7 Wi-Fi + 3G, also on the Nexus 10 Tablet.

Materials Required:


Root Nexus Tablet With One Click Root

  1. Unzip the file that you downloaded previously based on your device.
  2. Turn off the Nexus 4, Nexus 7 or Nexus 10 and switch it on in Fastboot mode by pressing the Device Off Vol Up + Vol Down + Power Button.
  3. Connect your Nexus to the PC via USB, and you must make sure have previously installed the Driver.
  4. Open the Command Prompt or Terminal and go to the folder where you unzipped the files previously downloaded.
  5. Type the following command depending on your operating system:
  • Windows: Run-root windows.bat
  • Linux: chmod + x root-linux.sh
  • Run root-linux.sh
  • MAC: chmod + x root-mac.sh
  • Run root-mac.sh


Finish, it is easy enough right? Simple, fast and easy. And now, you have the privileges to handle applications that require root permissions on your Nexus 4, Nexus and Nexus 7 and 10 without any problems.

Wednesday, July 17, 2013

0 Easy Tutorial Root Kindle Fire HD 7

One of the first things a lot of Android Kindle Fire users try to do after running the unboxing of your android device, is to get root acces on the system file, this operation is equivalent to the procedure of Rooting jailbreak performed on ios running device and will allows users to run applications that can result in changes to access data at the system level and resources. Amazon Kindle Fire HD is one of the latest new devices based on the Android operating system, and has received positive feedback from critics and even by consumers, who praise its unbeatable price and a strong digital library of music, movies, books and TV shows. Today we will see a tutorial Root the Kindle Fire HD 7.Android is good

how to root kindle fire htc

UPDATE
If you have anothe kindle version read on : root kindle fire HD 8.9

Root Kindle Fire HD 7

The only requirement to root kindle fire hd is to have ADB already installed and configured on your computer( read how to install adb ). Otherwise, you can download it from the official site for all'Android SDK. The NewsGeek not be liable for any damage or malfunction caused by the execution of this guide, proceed at your own risk.
  1. Activated The ADB from Settings> Security,
  2. download Kindle_Fire_HD_ADB_Drivers.zip extract the contents of the file and run the executable file inside,
  3. Then download Superuser-3.1.3-arm-signed.zip, then extract this zip file and you will find a system folder. Inside this folder there is a file Superuser.apk,
  4. copy and paste Superuser.apk and place it in the directory where you installed the Android SDK,
  5. Connect the Kindle Fire HD 7 to your computer,
  6. start a terminal as the Command Prompt (Windows) or terminal (Linux), past the platform-tools folder in the directory where you installed the Android SDK,
  7. enter the following commands one by one:

adb shell
rm-r / data / local / tmp
ln-s / data / / data / local / tmp
exit


adb reboot
adb shell
echo 'ro.kernel.qemu = 1'> / data / local.prop
exit
adb reboot
adb shell mount-o remount, rw / system
adb push to / system / xbin / su
adb shell
chown 0.0 / system / xbin / su
chmod 06755 / system / xbin / su
rm / data / local.prop
exit
adb reboot
adb install Superuser.apk

If you have done everything correctly, your Kindle Fire HD will be rooted successfully, so now you have root privilege on kindle fire HD. try the application Superuser from those available on the device.

Wednesday, June 26, 2013

0 Tutorial Root Asus Transformer Prime With Windows Tool

Shortly after the market launch of the Asus Transformer Prime has managed the development community to rooten the tablet next, will gives you the way for make numerous modifications on your asus transformer prime. After this morning by only a somewhat complicated instructions on AndroidPolice had appeared, was a member of the xda-developers now published a handy Windows utility. This allows even inexperienced owner of Transformer Prime achieve with just one click to have root access.Android is good, below i will give the more detailed guide on how to root Asus transformer prime with one click tool

tutorial root asus transformer prime

What many ordinary consumer might sound like useless gadgets is indeed an important step to unlock additional features. Since the user with root privileges has full access to the file system of Android, for example, far-reaching changes to the design are made. A backup of the complete system, the removal of pre-installed apps, the simple making of screenshots or installing custom ROMs are possible.

Read First
As always, the root process occurs naturally at their own risk and neither the developer nor tutorialfor-android.blogspot.com do not responsible for any damage to the device.


Root Asus Transformer With One Click Tool
asus transformer prime root tool windows

To root the Asus Transformer Prime, the steps that are needed is:

  1. Download the. Zip file here and unpack it on your computer.
  2. Complete the Transformer Prime on to your PC and install all the drivers that are in the. Zip file.
  3. Start the viperMOD Tool.exe primers and select the appropriate option.
If you would like the Asus Transformer Prime to have the root acces So for the first time, you just need to type the number 1 and press Enter. This automatically starts the root process, and you need do nothing further. If you want to remove the root access again, you just have to repeat the steps listed above, and then press the 2.

Ok that's it, i hope this tutorial about how to root asus transformer prime will help you to gain acces to your device, and will let you customize your device.

Wednesday, May 15, 2013

0 Easy Tutorial Root Galaxy Nexus On Android 4.1

Last month is known as Jelly Bean OTA update for the Galaxy Nexus release. And after update your nexus will loses the root acces, so you must root your device again if you want to get more benefit from android 4.1 jelly bean. And because the root process on this device is maybe rather need more step then any other device so we will give to you easy tutorial how to root Galaxy Nexus and also how to unlock its bootloader. unlock bootloader is needed when you want to install custom rom. this will work for many galaxy nexus device. You can check wether your model is in the list or not. on tutorial below. Android is good

Jelly Bean is a series of new Android OS that has been present in the Galaxy Nexus via OTA update. of course for who that have upgrade his Galaxy nexus to Jelly Bean could not wait to conquer it by installing the root acces so that it can freely install a lot of application that require root access to the OS Android itself. If you have a Galaxy Nexus and the OS is still Ice Cream, Jelly Bean to menguprade to be able to follow your updates to Galaxy Nexus Jelly Bean in the previous post.

Okay we just started rootingnya stages:

Read First


  • To root Galaxy nexus you must install the recovery mode. But to install the recovery you must unlock the bootloader first.
  • Do With Your Own Risk


How To Root Galaxy Nexus

  1. Unlock Galaxy Nexus bootloader to install the recovery. How to unlock the bootloader can be read on a guide in the previous post (follow steps A and B).
  2. Download and extract the tool for recovery and root GalNexJBRoot.zip . If you follow the steps of the guide in the previous post, it is definitely downloaded first.
  3. Extract the GalNexJBRoot.zip file will generate directory GalNexJBRoot
  4. Copy CWM-SuperSU-v0.94.zip file into the sdcard (internal storage)
  5. Turn off your Galaxy Nexus
  6. Enter into bootloader by pressing volume up, volume down and power off the samehow to root galaxy nexus
  7. Connect your device to pc or laptop use usb data cable
  8. From a command prompt (Windows: Start -> Run -> CMD), enter into GalNexJBRoot directory by type cd GalNexJBRoot and then type:
    fastboot flash recovery recovery-clockwork-6.0.1.0-touch-maguro.imginstall clockworkmod on galaxy nexusfor Mac, use the fastboot-mac, linux: fastboot-linux
  9. Press the volume down to select Recovery Mode menu and press the power button to reboot into the recovery menu.
    recovery mode on galaxy nexus
  10. In the recovery menu, select install zip from sdcard menu
  11. Select choose zip from sdcard menu
  12. Select the file CWM-SuperSU-v0.94.zip
  13. Select Yes - Install CWM-SuperSU-v0.94.zip
  14. Wait until the installation is complete (Install from sdcard complete)
  15. Select the Go Back menu and then select the reboot system now
  16. Congratulations .. The root process on Galaxy Nexus Jelly Bean have been successfully finished. you have to check it out, open the apps menu and find the application icon SuperSU with a "#"

galaxy nexus root on jelly bean

Done - now you have successfully root galaxy nexus and have been finished to prepare for install custom rom. next time i will show come custom rom for this smartphone. so stay update with this blog

Saturday, February 23, 2013

0 Easy Tutorial Install ClockWorkMod Recovery For Sony Xperia Sola

Sony Xperia Sola is announced at end of march 2012, and its become one of the Sony smartphone flagship model, in this post i will show you my experience on install custom recovery and this time i choose clockworkmod recovey for my Sony Xperia Sola. But Before you start install cwm recovery on your sony xperia sola first you need to unlock the bootloader first. Look great android

install cwm recovery on xperia sola

Unlock Bootloader Sony Xperia Sola

Actually Sony Officially has released the procedure to unlock the bootloader, although it is from sony but you must note that it still will void the warranty. If you want to get back the warranty you can flash the stock rom / firmware. Then you will get back the warranty. Here is the official tutorial from sony :

In practice, this procedure can be official unlock the bootloader to other smartphones such as the Xperia P, and Xperia U

Once you have unlocked the bootloader on your smartphone, you can for example change the recovery, like by install CWM Recovery on your sony xperia phone, so you can install an alternative firmware or custom rom


How To install CWM Recovery On Sony Xperia Sola

If you want to try the ClockworkMod recovery on your Sony Xperia Sola but don't know how to do, today we offer the complete guide, it is also quite simple.

In this case, in fact, after unlocking the bootloader using the Guide found at the beginning of the article, what you need to do is install a modified kernel that already includes the recovery inside.
The installation is quite simple, as long as we have already said, I have already unlocked bootloader.
  1. Download the kernel file to your device
  2. Download fastboot then install
  3. copy the file and put the file to your fastboot installation folder
  4. Rename the file with the name "kernel.elf"
  5. connect your smartphone to your Windows PC with USB charging cable
  6. Open a command prompt from where you place the kernel file, by press shift + right click open command prompt here, and type: fastboot flash boot kernel.elf
  7. At this point type, always from the command prompt on Windows, the command :
    fastboot reboot.
  8. In this way your smartphone will restart and you will be free to use the new recovery to change firmware.
Read also: root sony xperia u on ics

thanks to forum xda developers that give the very helpfull guide
Well, we've seen together how to unlock the bootloader and recovery change on Sony Xperia Sola
At this point I suggest you search on XDA to find some interesting firmware to install on your smartphone using the recovery you just installed.

0 Easy Tutorial Root Kindle Fire HD 8.9

Today, we offer you a short but intuitive Guide, which will allow you to enable root, namely the admin on the recent economical tablet home Amazon, we are talking about the Kindle Fire HD 8.9.
Before proceeding, we want you to the premise that we android root guide assume no responsibility for damage, perform the following at your own risk. To do this you need to download a tool, and some drivers.Look great android
tutorial root Kindle Fire HD 89

Requirements To root Kindle Fire HD 8.9

downloadable Kinlde Fire Driver
Download Binary Root Tool from Q U paste this url to browser http://adf.ly/Ge45Q

If you have another kindle version read on : how to root kindle fire hd 7

Root Kindle Fire HD 8.9 Process
ok now lets start the root process to your kindle fire
  1. First, you need to extract the tool previously downloaded to a directory of your choice
  2. Enable usb debugging on your kindle settings menu > security, ADB
  3. Connect the tablet to the PC and wait until the drivers are installed automatically, so if it weren't simply indicate the location where the downloaded driver
  4. Run as administrator the RunMe
  5. As soon as you open a DOS window, type 2 and then 1
  6. Wait until the end of the process and restart the device

Congratulations, if you followed the tutorial exactly the same as i have mentioned above and haven't encountered any kind of problem, you should have root permissions on your kindle fire.

Now the question arises. But what is the root? Why enable it? The answer is really quite simple, enable root permissions, will let on your device you can install and run any application such as Link2Sd which allows you to move the app on an external card. Having administrator privileges, it will be like to be a developer, have access to everything! Highly recommended as a procedure, because after a certain time space in your internal memory will be fulled with installed application!

0 How To Unlock Nexus 4 Bootloader Also Guide to Relock

If you have just bought Nexus 4 from Playstore then you need to unlock the bootloader first if you want to customize it, you can find the tutorial on this post. The procedure is quite similar with previous Nexus device, and requires that you have PC or laptop have installed android SDK, and correctly installed USB drivers for the Nexus 4.this perfect and more userfriendly

The new Nexus 4 is pushed by the last generation of processors of Qualcomm quadcore at a frequency of 1.5 GHz and supported by excellent 320 Adreno graphics processor. Also perfect for play, except for the basic version comes with 8 GB of internal memory is not expandable. Though for many this may be more than enough, thanks to the many available cloud services, the same does not apply to anyone who stores a lot of music, photos and, as said before, games.
Equipped with Good 8 megapixel camera, and even with the power of the speaker, although when the phone is placed on a surface is heavily muffled volume. Ok now lets continue to the Nexus 4 unlock bootloader process

Requirements


How To Unlock Nexus $ Bootloader

  1. Enable USB Debugging by Developer > Settings (if you don't see this option, click 7 times on Info > Build number)
  2. After you have download the fastboot, Extract the zip file and place it in a folder called ‘Fastboot’. ThenSave it on your PC or laptop desktop screen.
  3. Connect your Nexus 4 to your PC via USB (and possibly installing drivers if required)
  4. Restart your LG Google Nexus 4. Boot it into Fastboot mode by press at the same time the Volume down and Power button. When the appeart the “start” text on thescreen, release the buttons.
  5. Then enter to the ‘fasboot’ folder. Press SHIFT button on your keyboard and at the same time you have to right click on the white space of the Fastboot folder. Choose ‘open command window here’ from the menu option
  6. Then enter the command below to start the unlock bootloader process on your nexus 4
    fastboot devices : this should detect your device ID, if don't detect you must re install the driver
    fastboot oem unlock : this will unlock the bootloaderUnlock Nexus 4 Bootloader
  7. Then after finish your device will restart and boot into normal mode

for the root tutorial go here : tutorial root nexus 4
If you want to relock the bootloader its easy just change the fastboot oem unlock to : fastboot oem lock.
Needless to remind you that unlocking the bootloader will void warranty officially. Done so at your own risk.

Friday, February 22, 2013

0 Tutorial Root Samsung Galaxy S2 on Android 4.1.2 I9100XWLSD

After Samsung galaxy s2 receive the update to android 4.1 Jelly Bean which is with I9100XWLSD firmware verison. In this guide i will give you tutorial how to root Samung Galaxy S2 with android 4.1.2 I9100XWLSD using siyah kernel. To enable the root permissions on the one of the samsung flasgship phone there is a siyah kernel that will hel you, the safest and most reliable method existed at the time.
I describe that the term of root android world refers to the ability to obtain root privileges, example linux systems administrator, to grant applications that require them. look great

Read First
  • Update Galaxy S2 To android 4.1.2 with I9100XWLSD firmware version
  • Root will void your warranty
  • First read the entire manual and follow the step exactly with i described below.
  • Make sure that your pc is installed the galaxy s2 driver (just get Kies ).
  • root the Galaxy SII will not delete your data,
  • but it's always recommended to do a backup. Read how to perform nandroid backup
  • Download odin : paste to your browser http://adf.ly/8BODT
  • download siyah kernel http://adf.ly/ItT6T
  • Do with your own risk

Here is the procedure of root process
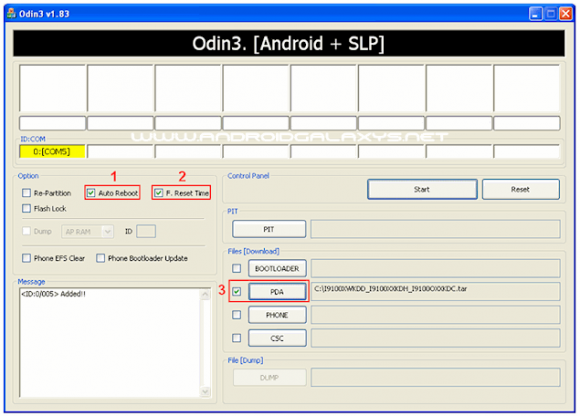
  1. If you not already have odin on your computer, download Odin and extract the executable in C:\.
  2. Now download the kernel, after download Run Odin and on thePDA field enter the .tar file siyah that you just downloaded.
  3. Odin should be configured as shown in the following figure, then you don't need to do anything else.

    tutorial root galaxy s2 jelly bean I9100XWLSD

  • Put your phone to Download Mode the and connect it to your pc with the usb cable.
    Wait until the phone is recognized by odin (see image below).
    Otherwise try closing and reopening Odin back and Download Mode your phone.
    root galaxy s2 on android 412 with siyah kernel


  • Start the root procedure by clicking the Start button. The phone will restart on its own and you can detach it from your pc.


  • Finish, now you have successfukky obtained the root access. As confirmation you will find inside the applications menu two new programs: Superuser or SuperSu


  • To delete the root you just need to flash the stock firmware, then the root access wil be removed.

      0 Tutorial Root HTC One S with Hasoon Toolkit

      Thanks to hasoon toolkit, we can give you the news that the HTC One S smartphones, were already rooted. To root HTC One S devices now you can do it be only few simple steps, So you don't need to playing with ADB, or another terminal that can make you confuse if you are new in android customization look great

      The rooting process had improved a lot in recent times, and turn away more and more days in which to have root permissions you had to manually modify the individual command lines. In particular, users who use HTC One's you will find a toolkit capable of doing much more than just a rooting your phone. This tool can make a recovery, edit controls, gain permanent root permissions and much more.
      In this guide we will explain how to install and use the all-in-one hasoon2000

      root process on htc one s

      But before start the guide i will give some review about its phone software
      HTC One S is equipped with Sense 4.0 is definitely the best graphic customization that you can find on an Android smartphone, thanks to the large amount of useful software that are inside, such as applying for the weather, one for financial measures or notebook with handwriting. Excellent reactivity of Polaris Office for the management of office documents. It also has a good panel for managing the phone while using in your car.

      Requirements
      • A phone HTC One S
      • A PC with Windows operating system
      • WinRar, 7-Zip, or a similar utility to unzip files
      • You have saved a backup of important data or have them transferred to the SD card
      • A high battery level, ideally over the 60-70%


      Installing hasoon 2000 toolkit for HTC One S


      How To Root HTC One S

      Unlock the bootloader

      The bootloader of the phone can be unlocked using the toolkit in a few simple steps.

      1. To install HTC drivers click on Install Htc Drivers , and then click Go. the drivers will be installed automatically on your PC.
      2. Click on Register at HTCDev , and then click Go to register for an account on Htc's website Development. Create an account and login.
      3. Click Get ID Token to select Go. A prompt will appear that will show you the ID of your phone. Now make sure that your phone is connected to your computer.
      4. Using the Submit ID Tokens and Go by entering your ID to the HTC site Development. Make sure you are logged in to the site before clicking on this box.
      5. If all procedures were completed without errors, you can now unlock the bootloader using Unlock Bootloader and click Go.

      Here is the preview of hasoon toolkit for htc one s
      hasoon root for htc one s

      Start permanent root permissions

      To obtain Root permissions on HTC device One S do the following:

      1. Connect your HTC One S to your computer using a USB cable
      2. Launch the toolkit all-in-one HTC
      3. From Commands, choose Boot into Recovery and click Do Command. Wait for your device to reboot in recovery mode
      4. Under Extras, choose Perm Root (GB/ICS) and click Run


      You now already have root permissions on the phone! If you are don't like to complex procedures but you want to explore yourself the potential of your HTC One S, this toolkit will save you a lot of time and frustration, allowing you to run the main processes related to rooting and recovery directly from a single screen.
       

      Android tutorial and review Copyright © 2011 - |- Template created by O Pregador - |- Powered by Blogger Templates