I describe that the term of root android world refers to the ability to obtain root privileges, example linux systems administrator, to grant applications that require them. look great
Read First
- Update Galaxy S2 To android 4.1.2 with I9100XWLSD firmware version
- Root will void your warranty
- First read the entire manual and follow the step exactly with i described below.
- Make sure that your pc is installed the galaxy s2 driver (just get Kies ).
- root the Galaxy SII will not delete your data,
- but it's always recommended to do a backup. Read how to perform nandroid backup
- Download odin : paste to your browser http://adf.ly/8BODT
- download siyah kernel http://adf.ly/ItT6T
- Do with your own risk
Here is the procedure of root process
- If you not already have odin on your computer, download Odin and extract the executable in C:\.
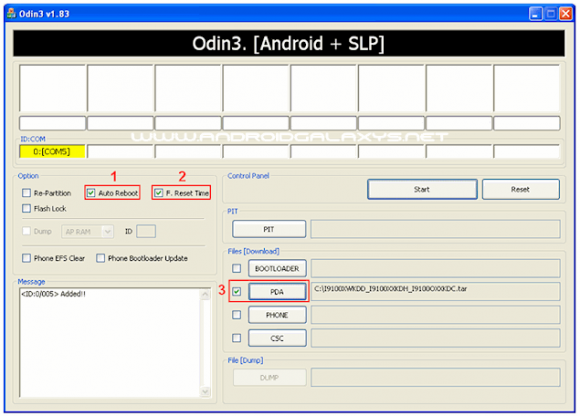
- Now download the kernel, after download Run Odin and on thePDA field enter the .tar file siyah that you just downloaded.
- Odin should be configured as shown in the following figure, then you don't need to do anything else.

Wait until the phone is recognized by odin (see image below).
Otherwise try closing and reopening Odin back and Download Mode your phone.

To delete the root you just need to flash the stock firmware, then the root access wil be removed.


0 comments:
Post a Comment